Depending on your game, you might need to get user text input, such as the player's name or verbs/actions for a text-based adventure (who knows?).
This article shows how you can do that in GameMaker: Studio (GMS) and it also explains how to make a simple command prompt to use in-game.
We assume that you are familiar with GMS and that you have intermediate knowledge of programming/GML.
[Looking for the source code? Click here!]
Luckily for GMS developers, GMS provides a keyboard_string variable that holds a string containing the characters typed on the keyboard (up to 1024 characters). GMS deletes the last character if the backspace key is pressed so you do not have to worry about that.
Also, this variable is writable so we can manipulate it via code (e.g. clear its contents).
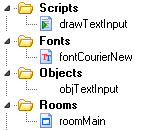
For this article, create a GMS project and add a room, an object, a font and, for now, a script called drawTextInput (see figure below).
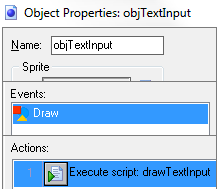
Add a Draw event in the object and call the script drawTextInput as the only Draw event action (see figure below).
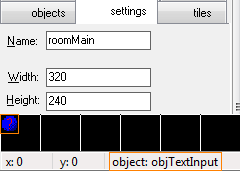
Finally, add one instance of the object in the room (see figure below).
Add the following code in the drawTextInput script, changing the font resource name according to yours.
/// drawTextInput()
{
  draw_set_colour(c_lime);
  draw_set_font(fontCourierNew);
  draw_text(10, 10, keyboard_string);
}Run the project and start typing. You should see what you type in the game screen, starting at (10, 10). Use the backspace key and notice that GMS takes care of deleting characters (see figure below).

GML uses the '#' symbol to represent a new line/line break. Try typing the symbol and see for yourself: instead of showing #, you will get a line break. To change that behaviour, we will need to use another variable to hold and draw the user input. For that, create two new scripts: initTextInput and updateTextInput. Assign the first one to the object's Create event and the second one to the object's Step event.
Add the following code in the initTextInput script. This will create a new instance variable called userInput.
/// initTextInput()
{
  userInput = "";
}Add the following code in the updateTextInput script.
/// updateTextInput()
{
  if (keyboard_check_pressed(vk_enter))
  {
    keyboard_string += chr(13);
  }
  userInput = string_replace_all(keyboard_string, "#", "\#");
}
We included code in updateTextInput to add a line break to keyboard_string whenever the enter key is pressed, using chr(13) instead of the '#' symbol.
Next, we replace all '#' symbols in keyboard_string with '\#' and save the new string in the userInput variable. That way, our project can draw the '#' symbol correctly.
Modify the drawTextInput script to use the new userInput variable instead of keyboard_string.
/// drawTextInput()
{
  draw_set_colour(c_lime);
  draw_set_font(fontCourierNew);
  draw_text(10, 10, userInput);
}After these changes, the project handles the '#' symbol and enter key (see figure below).

Now that we know how to get and draw user text input, let's create a simple command prompt. By "simple" we mean that our command prompt will not have history and will not draw details such as a blinking cursor. We will focus on calling a script via this command prompt.
The command prompt will accept the following syntax:
/<command_name> <param1> <param2> <paramN>
This means that any input that should call a script must start with the '/' symbol and parameters are separated by blank spaces (parameters are optional and parameter count can vary based on the script/<command_name> being called).
Declare new variables in initTextInput to hold the command prompt result and to define each draw_text position.
/// initTextInput()
{
  userInput = "";
  commandString = "";
  commandResult = "";

  startX = 10;
  startY = 10;
  lineHeight = string_height(">");
}Hopefully the following code is self-explanatory by now.
/// drawTextInput()
{
  draw_set_colour(c_lime);
  draw_set_font(fontCourierNew);
  draw_text(startX, startY, "> " + userInput);
  draw_text(startX, startY + lineHeight, commandString);
  draw_text(startX, startY + lineHeight * 2, commandResult);
}Change the updateTextInput script with the following code. We will create runCommand and clearUserInput in a bit.
/// updateTextInput()
{
  userInput = string_replace_all(keyboard_string, "#", "\#");
  if (keyboard_check_pressed(vk_enter))
  {
    commandString = userInput;
    runCommand(userInput);
    clearUserInput();
  }
}Create the clearUserInput script with the following code.
/// clearUserInput()
{
  keyboard_string = "";
  userInput = "";
}Create the runCommand script with the following code, which is the core of our command prompt.
/// runCommand(command)
{
  var command = argument[0];

  var array = stringSplit(command, " ");
  if (string_length(array[0]) > 0)
  {
    if (string_char_at(array[0], 1) == "/")
    {
      array[0] = string_delete(array[0], 1, 1);
      var scriptIndex = asset_get_index(array[0] + "Execute");
      if (script_exists(scriptIndex))
        commandResult = string(script_execute(scriptIndex, array));
      else
        commandResult = "Unknown command.";
    }
  }
}
The runCommand receives a string as parameter, which is the user text input (see updateTextInput, line 7). This full string is split and saved in an array (line 5), with each substring separated by a blank space (we will create stringSplit function later).
After splitting the user input string, we check if the user is trying to call a script (the first character must be the '/' symbol, lines 6-8). If positive, we remove the '/' symbol (line 10) and try to get an asset (script) called "<command_name>Execute" (line 11). If the script is found, we execute it (line 13). Otherwise, we show the message "Unknown command." (line 15).
The core of the command prompt lies in the lines 11-13. We use three handy GML functions: asset_get_index() returns the unique index of a game asset with a given name (passed as parameter) and we use it to get the script index that we must call. Before executing the script, we must check if it really exists, by calling the script_exists() function. The other handy GML function is script_execute(), which executes a script with a given index (passed as the first parameter).
Side note: we love script_execute()! If you program in another language, think of function pointers, callbacks, or delegates.
For each command that can be used in our command prompt, two scripts must be created: one named "<command_name>Execute", where <command_name> must match the command used in the command prompt, and the script that really does the work.
The script with the "Execute" suffix is used to make the link between the command prompt and the "real script" that has the real logic. Check the line 13 of the runCommand script: we execute the script with "Execute" suffix and pass an array to it as a parameter (script_execute(scriptIndex, array)). The "Execute" script is responsible for calling the real script and passing the correct parameters to it and is also responsible for returning the real script's return value.
This might sound a little confusing, so let's check an example. Supposed we want to have a command called "add", which receives two numbers as parameters and returns the sum of these two numbers. We can create a script named add with the following code:
/// add(num1, num2)
{
  var num1 = argument[0];
  var num2 = argument[1];
  return num1 + num2;
}
Now, how would the "Execute" function look like for this function? It would look like addExecute below:
/// addExecute(array)
{
  var params = argument[0];
  if (array_length_1d(params) == 3)
  {
    var num1 = real(params[1]);
    var num2 = real(params[2]);
    return add(num1, num2);
  }
  return "Invalid parameter count.";
}
The function addExecute checks if the array received as a parameter has the correct number of elements (line 4). In this case, the element count is 3 because params[0] contains the "add" command, params[1] holds the first number to add and params[2] holds the second number to add. After extracting and converting the parameters to numbers (lines 6 and 7), the function calls add() passing the correct parameters and returns the value returned by add(). If the array size is incorrect, it returns the "Invalid parameter count." message.
The add and addExecute example can be seen in the figure below.

The nice thing about our command prompt is that it is easy to add other commands to it. Of course, some commands might not be trivial, but we guess most should be easy to add.
If you go back to the code we wrote, you will notice that there is no if/switch checking "if user typed command ABC, call ABC(), else if user typed command XYZ, call XYZ(), else if (...)". We automated this process with those three handy GML functions and the way we handle things using the scripts with "Execute" suffix. If we want to add another command, we just need to create two new scripts. No need to change existent code.
Let's add a command called "clear", which receives no parameters. This command should clear the strings drawn onscreen. Create a new script called clear with the following code:
/// clear()
{
  clearUserInput();
  commandString = "";
  commandResult = "";
}
Then create another script, called clearExecute, with the following code:
/// clearExecute(array)
{
  clear();
  return "";
}
Notice that even though the function receives an array as parameter, we do not use it and just call clear() and return an empty string.
We can also use different command names to do the same thing. Maybe this does not make much sense, but maybe you want to have both /exit and /quit to call game_end()? As another example, if we want to include a sum command that does the same thing as add, we can create a script called sumExecute with the following code:
/// sumExecute(array)
{
  return addExecute(argument[0]);
}We were almost forgetting about stringSplit! Create a new script called stringSplit and add the code below to it.
/// stringSplit(string, delimiter)
{
  var delimiter = argument[1];
  var theString = argument[0] + delimiter;

  var delimiterLength = string_length(delimiter);
  var count = string_count(delimiter, theString);
  var position = 0;

  var returnArray;
  for (var i = 0; i < count; ++i)
  {
    position = string_pos(delimiter, theString) - 1;
    returnArray[i] = string_copy(theString, 1, position);
    theString = string_delete(theString, 1, position + delimiterLength);
  }

  return returnArray;
}We believe you could use this article as a base to write your own text adventure game or chat system, modify it to have a command prompt with more features and include it in your project so you can have an in-game console, which could really help with polishing, debugging and other cool stuff.
If you used what you learned in this article somewhere, please do let us know via Twitter or Facebook! We would be happy to check your work!
The implementation of this article is available on the GameMaker: Marketplace ("Command Prompt Basic").
If you liked this article and want to supports us, you can get a "+version" in the GameMaker: Marketplace ("Command Prompt"). Thanks in advance! :)
Copyright © 2016, Kishimoto Studios. All Rights Reserved.